


Art Deco Beanie
Free DIY Instructions using Light Worsted or Worsted Weight Yarn
A fun and unique, textured crochet beanie design featuring arches and shells that characterise the Art Deco era.
A versatile accessory suited to all ages and genders. Make it slouchy or fitted.
Stress free sizing – no set gauge required.
Use any yarn to size to standard sizes using included sizing table, or to custom size according to individual measurements.
An ad-free PDF version will be available from Ravelry soon.
To save this pattern to make later, add to your Ravelry queue (when pattern added to Ravelry), and/or pin via image below:
This is an original pattern by Farrah Jane Tate. You are welcome to sell products you have made using my patterns; however, I ask that you refer to the exact name of my pattern somewhere in the text of your listing. You may not copy, re-publish, sell, distribute, translate without permission, or claim my photos or patterns as your own in any way. This pattern may not be used in a classroom/workshop setting without my permission. Please note: If you have downloaded this pattern from an unofficial site (other than Ravelry, Love Crafts, Etsy, or my personal blog), this will be an unauthorised version and may not be the most current version. Please visit one of these sites to download an official, version-controlled copy.
Inspiration
I recently had the opportunity to participate in the 2026 Cancer Comforts Blog Hop. I came up with four separate designs to decide between. Two I have documented. One I probably won’t proceed with at all, and the other I am yet to document.
I was tossing up hard between the Barbara D Beanie and the Art Deco Beanie but decided on the Barbara D Beanie since it is a quicker and easier make, and a little more yarn-sparing… so the perfect kind of charity beanie make for all makers.
Anyway, I received lots of compliments for the Art Deco Beanie also, so I thought I’d get the pattern up on The Crochet Fix Blog so you have the opportunity to make your own also.
I’ve used a number of different yarns for the example beanies – two are Worsted yarns that are on the thinner side and one is a Light Worsted Yarn that is on the thicker side. All of these look lovely. I do think the natural fibre yarns or yarns with a mix of acrylic and natural fibre provide the best texture – it really pops – but if you have a favourite Worsted yarn that you already use for beanies by all means give it a try… And please share your finished beanies with me as I am always inspired by all your fun and gorgeous yarn choices.
Pattern Details
Refer to Appendix A for example project details.
- Project Level: Intermediate.
- Yarn: Worsted/10ply/Cat. 4 weight yarn (recommended) or Light Worsted/DK/8ply/ Cat. 3 weight yarn.
Low-pill or non-pill, easy wash fibre (such as cotton and cotton/bamboo blends). - Hook: Use yarn label instructions as a guide for selecting hook size. Swatch to determine the optimal hook size for personal tension.
- Size: Size to preference using Appendix B Sizing Guide.
- Gauge: Specific gauge not required.
- Notions: Scissors and darning needle.
- Stitch Terminology: US. Refer to Abbreviations and Special Stitch Instructions.
- Pattern Synopsis: Constructed bottom up, in the round, using textured stitches with a repeat over 4 rounds. Top opening is cinched closed. Brim is optional/added separately.
- Social Media Share: @TheCrochetFix #ArtDecoBeanie
Abbreviations
- ~ = Approximately.
- 2DCCl = Two Double Crochet Cluster Stitch. Refer to Special Stitch Instructions.
- 3L/3LO = Third Loop/Third Loop Only. Refer to YouTube video for location.
- BL/BLO = Back Loop/Back Loop Only.
- Btwn = Between.
- Ch = Chain.
- DC = Double Crochet.
- FHDC = (Chainless) Foundation Half Double Crochet (optional substitution for first two rounds). Refer to YouTube video.
- FL = Front Loop.
- FpDC = Front Post Double Crochet.
- FpDC2Tog = Front Post Double Crochet Two Stitches Together. Refer to Special Stitch Instructions.
- HDC = Half Double Crochet.
- Invis Join = Invisible Join. Refer to Special Stitch Instructions and YouTube video.
- n = Number of stitches in Foundation round.
- Puff = Puff Stitch (modified). Refer to Special Stitch Instructions.
- RS = Right Side.
- SC = Single Crochet.
- Shell = Shell made from 5 DC stitches or 3 DC stitches (in the one stitch).
- Sk = Skip.
- Sl St = Slip Stitch.
- Sp = Space.
- Spn St = Spin Stitch (optional edging only). Refer to Special Stitch Instructions and YouTube video.
- Star St = Star Stitch (optional brim only). Refer to Special Stitch Instructions and YouTube video.
- St(s) = Stitch(es).
- Textured Shell = Textured Shell made using 3LO of Shell stitches.
- WS = Wrong Side.
- Yo = Yarn over (hook).
Special Stitch Instructions
2DCCl
Yo, insert hook through st, yo, pull through a loop (three loops on hook). Yo, pull yarn through first two loops on hook (two loops on hook). Yo insert hook through same st as before, yo, pull through a loop (four loops on hook). Yo, pull yarn through first two loops on hook (three loops on hook), yo, pull yarn through all three loops on hook.
FpDC2Tog
Yo, insert hook around front of first st post, yo, pull through a loop (three loops on hook). Yo, pull yarn through first two loops on hook (two loops on hook). Yo, insert hook around front of next st post, yo, pull through a loop (four loops on hook). Yo, pull yarn through first two loops on hook (three loops on hook), yo, pull yarn through all three loops on hook.
Invis Join
Remove loop from hook, insert hook from back to front BL and FL of st that join is to be made in, replace loop on hook, pull loop through st (from front to back), gently pull yarn end to tighten join.
Puff
Note: The following instructions are for a modified Puff. One less * repeat can be worked for a less full Puff, if this is preferred.
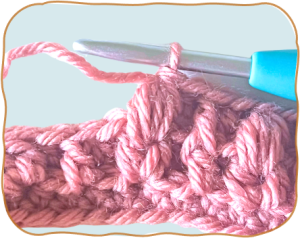
Yo, insert hook through st, yo, pull through a loop (three loops on hook). *Yo, insert hook back through same st as before, pull through loop (an additional two loops on hook). Repeat from * twice more (nine loops on hook). Yo, pull yarn through first eight loops on hook (Puff ‘eye’ made, with two loops on hook). Yo, pull yarn through both loops on hook (Puff completed).
Spn St (brim and edging option only)
Insert hook through st, yo, pull through a loop (2 loops on hook). Yo, pull yarn through first loop on hook (2 loops on hook). Spin hook 360 degrees clockwise (a full rotation) on the horizontal plane. Yo, pull yarn through both loops on hook.
Star St (brim option only)
First Star St:
Ch 3 (to commence). Insert hook, yo and pull a loop through both second and third Ch sts of beginning Ch 3 and first three foundation sts (for six loops on hook in total). Yo, pull yarn through all six loops on hook (Star ‘base’ made). Yo, pull yarn through loop on hook (Star ‘eye’ made).
Subsequent Star St:
Insert hook, yo and pull a loop through each of previous Star ‘eye’, back of last loop of previous Star, last foundation st used for previous Star, and next two foundation sts along (for six loops on hook in total). Yo, pull yarn through all six loops on hook (Star ‘base’ made). Yo, pull yarn through loop on hook (Star ‘eye’ made).
Last Star St:
Insert hook, yo and pull a loop through each of previous Star ‘eye’, back of last loop of previous Star, last foundation st used for previous Star, next two foundation sts along, and first Star ‘eye’ (for seven loops on hook in total). Yo, pull yarn through all seven loops on hook (Star ‘base’ made). Yo, pull yarn through loop on hook (Star ‘eye’ made).
Pattern Instructions
Notes:
- The beanie is constructed bottom up, commencing with two foundation rounds, then working a four round pattern repeat and finally finishing with rounds that shape the top of the beanie. An optional finishing edging or brim is added separately to the bottom of the beanie (reusing the Round 1 stitches).
- Refer to Appendix B for a sizing guide for circumference (chain stitch count) and length.
- Refer to Appendix C for images of the location to work the Puff (in between the two 2DCCl stitch posts) and the Shell (in the ‘eye’ of the previous round Puff).
- Ch 1/Ch 2 to begin the round and Invis Join/Sl St to finish the round do not count as a stitch for stitch count purposes.
- Invis Join will provide the neatest seam. However, if Sl St join is preferred this can be made in place of Invis Join.
Beanie
Round 1
Notes:
- Refer to Appendix B for a beanie circumference guide.
- If chain stitches are working up too tight go up a hook size for this round only or try the FHDC chainless foundation method instead.
- If preferred, a FHDC chainless foundation round can be made in place of both Round 1 and Round 2 instructions. Refer to YouTube video. Ensure the last FHDC is joined at the base and top to the first FHDC.
Make a multiple of four Ch sts (that measures the required circumference under slight tension), Sl St into first Ch st.
(St Count: n Ch)
Round 2
Notes:
- Refer to YouTube video for back bump location.
- If difficult to work into the back bump loop only, any two of the Chain st loops can be worked into instead.
Ch 1, HDC in back bump of first and each subsequent Ch st around, Invis Join into first HDC.
(St Count: n HDC)
Round 3
Ch 2, DC in first st, HDC in 3LO next st, 2DCCl next st, HDC in 3LO next st, *DC in next st, HDC in 3LO next st, 2DCCl next st, HDC in 3LO next st, rep from * around, Invis Join into first st.
(St Count: n/4 DC, n/2 HDC, n/4 2DCCl)
Round 4
Notes:
- Refer to Appendix C for Puff location.
Ch 2, FpDC around first st, HDC in 3LO next st, Puff in sp btwn two st posts of next 2DCCl, HDC in 3LO next st, *FpDC around next st, HDC in 3LO next st, Puff in sp btwn two st posts of next 2DCCl, HDC in 3LO next st, rep from * around, Invis Join into first st.
(St Count: n/4 FpDC, n/2 HDC, n/4 Puff)
Round 5
Notes:
- Refer to Appendix C for DC Shell location.
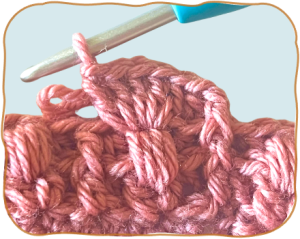
Ch 2, FpDC around first st, sk next st, 5 DC (Shell) in eye of next Puff, sk next st, *FpDC around next st, sk next st, 5 DC (Shell made) in ‘eye’ of next Puff, sk next st, rep from * around, Invis Join into first st.
(St Count: n/4 FpDC, n/4 Shells)
Round 6
Ch 2, FpDC around first st, sk next st, HDC in 3LO next st, 3 HDC in 3LO next st, HDC in 3LO next st (Textured Shell made), sk next st, *FpDC around next st, sk next st, HDC in 3LO next st, 3 HDC in 3LO next st, HDC in 3LO next st (Textured Shell made), sk next st, rep from * around, Invis Join into first st.
(St Count: n/4 FpDC, n/4 Textured Shells)
Round 7
Ch 2, FpDC around first st, sk next st, HDC in 3LO next st, 2DCCl in 3LO next st, HDC in 3LO next st, sk next st, *FpDC around next st, sk next st, HDC in 3LO next st, 2DCCl in 3LO next st, HDC in 3LO next st, sk next st, rep from * around, Invis Join into first st.
(St Count: n/4 FpDC, n/2 HDC, n/4 2DCCl)
Round 8
Ch 2, FpDC around first st, HDC in 3LO next st, Puff in sp btwn two st posts of next 2DCCl, HDC in 3LO next st, *FpDC around next st, HDC in 3LO next st, Puff in sp btwn st posts of next 2DCCl, HDC in 3LO next st, rep from * around, Invis Join into first st.
(St Count: n/4 FpDC, n/2 HDC, n/4 Puff)
Round 9
Ch 2, FpDC around first st, sk next st, 5 DC (Shell) in eye of next Puff, sk next st, *FpDC around next st, sk next st, 5 DC (Shell made) in ‘eye’ of next Puff, sk next st, rep from * around, Invis Join into first st.
(St Count: n/4 FpDC, n/4 Shells)
Round 10
Ch 2, FpDC around first st, sk next st, HDC in 3LO next st, 3 HDC in 3LO next st, HDC in 3LO next st (Textured Shell made), sk next st, *FpDC around next st, sk next st, HDC in 3LO next st, 3 HDC in 3LO next st, HDC in 3LO next st (Textured Shell made), sk next st, rep from * around, Invis Join into first st.
(St Count: n/4 FpDC, n/4 Textured Shells)
Round 11 onwards
Notes:
- Refer to Appendix B for beanie length guide.
If beanie not yet ~3/4 of the required beanie length (minus length of brim), then work repeats of Rounds 7 to 10 until beanie is this length.
Else skip to Shape Peak Rounds.
Example:
Total Beanie Length = 20cm.
Brim Length = 2cm.
Work repeats to a length that is approximately (20cm – 2cm) x 0.75 = 13.5cm.
Shape Peak Round 1
Ch 2, FpDC around first st, sk next st, HDC in 3LO next st, 2DCCl in 3LO next st, HDC in 3LO next st, sk next st, *FpDC around next st, sk next st, HDC in 3LO next st, 2DCCl in 3LO next st, HDC in 3LO next st, sk next st, rep from * around, Invis Join into first st.
(St Count: n/4 FpDC, n/2 HDC, n/4 2DCCl)
Shape Peak Round 2
Ch 2, FpDC around first st, HDC in 3LO next st, Puff in sp btwn two st posts of next 2DCCl, HDC in 3LO next st, *FpDC around next st, HDC in 3LO next st, Puff in sp btwn st posts of next 2DCCl, HDC in 3LO next st, rep from * around, Invis Join into first st.
(St Count: n/4 FpDC, n/2 HDC, n/4 Puff)
Shape Peak Round 3
Ch 2, FpDC around first st, sk next st, 3 DC (Shell) in eye of next Puff, sk next st, *FpDC around next st, sk next st, 3 DC (Shell made) in ‘eye’ of next Puff, sk next st, rep from * around, Invis Join into first st.
(St Count: n/4 FpDC, n/4 Shells)
Shape Peak Round 4
Ch 2, FpDC around first st, HDC in 3LO of next three sts (Textured Shell made), *FpDC around next st, HDC in 3LO of next three sts (Textured Shell made), rep from * around, Invis Join into first st.
(St Count: n/4 FpDC, n/4 Textured Shells)
Shape Peak Round 5
Ch 2, FpDC around first st, sk next st, 2DCCl in 3LO next st, sk next st, *FpDC around next st, sk next st, 2DCCl in 3LO next st, sk next st, rep from * around, Invis Join into first st.
(St Count: n/4 FpDC, n/4 2DCCl)
Shape Peak Round 6
Ch 2, FpDC around first st, Puff in space btwn two st posts of next 2DCCl, *FpDC around next st, Puff in sp btwn two st posts of next 2DCCl, rep from * around, Invis Join into first st.
(St Count: n/4 FpDC, n/4 Puff)
Shape Peak Round 7
Ch 2, FpDC around first st, 2 DC in ‘eye’ of next Puff, *FpDC around next st, 2 DC in ‘eye’ of next Puff, rep from * around, Invis Join into first st.
(St Count: n/4 FpDC, (n/4)x2 DC)
Shape Peak Round 8
Ch 2, FpDC around first st, sk next st, HDC in 3LO of next st, *FpDC around next st, sk next st, HDC in 3LO of next st, rep from * around, Invis Join into first st.
(St Count: n/4 FpDC, (n/4) HDC)
Shape Peak Round 9
Notes: Depending on the Shape Peak Round 8 stitch count this round may finish without a complete repeat. This doesn’t matter as the purpose of this round is only to further reduce the stitch count to enable easier cinching of the beanie top opening. Two options are provided – try both to see which provides the best finish for the chosen yarn.
Option 1
Ch 2, FpDC around first st, sk next three sts, *FpDC around next st, sk next three sts, rep from * around, Invis Join into first st.
(St Count: Shape Peak Round 8 St Count/4)
Option 2
Ch 1, FpHDC around first FpDC, sk next st, FpDC around next FpDC (counts as first FpDC2Tog), *FpDC2Tog around next two FpDC (sk other sts), rep from * around, Invis Join into first FpDC.
(St Count: Shape Peak Round 8 St Count/2)
Close Peak
Fasten off yarn with sufficient tail length to sew top opening closed. Use a needle to weave yarn in and out around stitches of peak opening and then gently pull/cinch closed.
Sew in yarn tail securely on WS.
Optional Brim or Edging
Notes:
- If adding a brim or edging, rotate beanie RS facing so peak is facing downmost and bottom opening is facing upmost.
- Join yarn into the base of the first Round 1 Chain stitch (in the two free loops).
- Work one of the brim or edging options below. Edging can also be optionally added after Brim has first been made.
- If brim is working up too tight loosen tension and/or go up a hook size.
SC Brim Option
Notes:
- SC stitches can be worked in BLO (all rounds) for additional texture.
Round 1
Ch 1, SC in first and each subsequent st around, Invis Join into first SC.
(St Count: n SC)
Round 2 onwards
Rep Round 1 as many times as required to achieve the preferred brim length and overall beanie length.
If not working finishing Edging, fasten off yarn leaving yarn tail of sufficient length to sew in.
Optional Spn St Edging
Ch 1, Spn St in first and each subsequent st around.
(St Count: n Spn St)
Fasten off yarn leaving yarn tail of sufficient length to sew in.
OR Star Stitch Brim Option
Notes:
- SC can be made in place of Spn St, if preferred.
- The YouTube Video demonstrates Star St being worked for a coaster; however, the same principle applies, working into the beanie foundation stitches instead of the previous round coaster stitches.
Round 1
Work Star St in all foundation sts around, Sl St into top loop of first Star St, Sl St into ‘eye’ of first Star St.
(St Count: n/2 Star St)
Round 2
Ch 1, 2 Spn St in the ‘eye’ of first and each subsequent Star St around.
(St Count: n Spn St)
Fasten off yarn leaving yarn tail of sufficient length to sew in.
Finishing
Sew in all remaining ends neatly and securely on WS.
Optionally top with yarn or faux fur pom-pom for extra charm.
Pattern Support
Available via thecrochetfix Facebook Community Group.
Pattern Versioning
| Version | Date | Comments |
| 0.1 | 21/09/2026 | Draft. |
| 0.2 | 10/10/2026 | Published version. |
Appendix A: Example Projects
For additional inspiration, refer to Ravelry projects.
Teal – Star St Brim
- Yarn: Spotlight Stores 4 Seasons Half n Half 10 ply (Worsted/Cat. 4 equivalent yarn) in Teal Melange shade, ~1 ball (~100g/3.5oz or ~160m/170yds) using less full Puffs (one less repeat).
- Hook: 5mm/H-8 (with reasonably loose tension).
- Foundation Chain Sts: 56.
- Beanie Rounds: 22.
- Brim Rounds: 2 (Star St with Spn St).
- Relaxed circumference: ~53cm/21”, with ~1-2 cm of negative ease/stretch.
- Length: ~22.5cm/9”.
- Fits: Average-size woman’s head, slightly slouchy.
Grape – SC Brim with Spn St Edging
- Yarn: Spotlight Stores 4 Seasons Marvel 12 ply (Worsted/Cat. 4 equivalent yarn) in Purple 1085 shade, ~1 ball (~100g/3.5oz or 160m/170yds), using less full Puffs (one less repeat).
- Hook: 5mm/H-8 (with reasonably loose tension).
- Foundation Chain Sts: 68.
- Beanie Rounds: 22.
- Brim Rounds: 3 (SC with Spn St edging).
- Relaxed circumference: ~54cm/21.25”, with ~1-2 cm of negative ease/stretch.
- Length: ~23cm/9”.
- Fits: Average to larger size woman’s head, slightly slouchy.
Pink – SC Brim with Spn St Edging
- Yarn: Spotlight Stores 4 Seasons 8 Ply Pure Merino yarn (thick Light Worsted/DK/Cat. 3 equivalent yarn) in Light Rose shade, ~2 balls (~100g/3.5oz or 172m/188yds).
- Hook: 4.5mm/7 (with reasonably loose tension).
- Foundation Chain Sts: 68.
- Beanie Rounds: 22.
- Brim Rounds: 3 (SC with Spn St edging).
- Relaxed circumference: ~50cm/19.5”, with ~1-2 cm of negative ease/stretch.
- Length: ~20cm/7.75”.
- Fits: Tween to small size woman’s head, slightly slouchy to fitted.
Appendix B: Basic Sizing.
The required beanie size can be determined by using:
A) The Sizing Guide Table, or
B) The Personalised Sizing Method.
A) Sizing Guide Table
The table below is based on The American Craft Yarn Council (ACYC) standard head circumference sizes and standard (fitted) beanie length.
| Size | Circumference | Fitted Length
(incl. brim) |
||
| Inches | Cm | Inches | Cm | |
| Child | 18 – 20 | 45.5 – 51.0 | 7.5 – 8.0 | 19.0 – 20.5 |
| Tween | 20 – 22 | 51.0 – 56.0 | 8.0 – 8.5 | 20.5 – 21.5 |
| Woman | 21 – 23 | 53.0 – 58.5 | 8.0 – 9.0 | 20.5 – 23.0 |
| Man | 22 – 24 | 56.0 – 61.0 | 8.5 – 9.5 | 21.5 – 24.0 |
Circumference measure:
First determine the table listed Circumference for the chosen Sizeƚ. Next determine the multiple of four Chain stitches, under slight tension, that most closely approximates the chosen circumference.
ƚNote:
- If in doubt, for a standard size beanie, use a measure that toward the lower end of the tabulated range, to account for beanie negative ease and stretching with wear.
- If the chosen yarn has considerable give/elasticity, or tension tends to be very loose, adjust the circumference measure down by half an inch or 1-2cm.
Length measure:
Look up the table listed Fitted Length for the chosen Size. For a slouchy beanie, add at least an inch or 3-4cm to the table beanie length.
B) Approximate Personalised Method
Circumference measure:
First measure the person’s head circumference. Next determine the multiple of four Chain stitches, under slight tension, that most closely approximates the measured circumference ƚ.
ƚNote:
- If the chosen yarn has considerable give/elasticity, or tension tends to be very loose, adjust the circumference measure down by half an inch or 1-2cm.
Length measure:
Measure the length from just above the person’s brow to their crown. For a slouchy beanie add at least an inch or 3-4cm to the measured length.
Appendix C: Images.
Puff Location
The Puff stitch is worked in the space between the two stitch posts of a 2DCCl stitch:
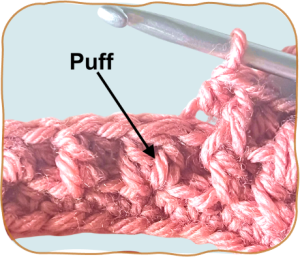
Insert the hook through the gap between these stitch posts to make the stitch.
If the yarn is splitty then the stitch posts may need to be cleanly separated with fingers prior to inserting the hook.
Completed Puff stitch:
Shell Location
The DC Shell is worked in the ‘eye’ of the Puff stitch:
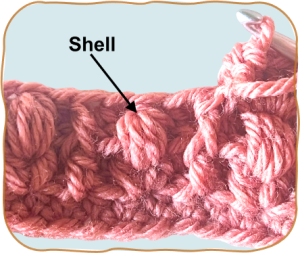
Completed Shell:
For more crochet beanie patterns…

Hi, I’m Farrah, founder of The Crochet Fix.
I’m championing your most wholesome obsession… crochet! And bringing beauty and joy to your daily soul fix of crochet.
I feature boho and retro designs, including many quick to make designs that are ideal for busy makers.
Wind down and de-stress with a quick, mindful and practical crochet project.


