


Flower Power Hexagon – Large Motifs
With a retro, seventies vibe these motifs can be used to quickly whip up all kinds of fun and funky flower power projects.
Cute bags, cushion covers, blankets and more.
So many project and colour combo options. Thoughtful and quick gift inspo galore – let your Flower Power imagination run wild!
For a PDF version with motif project diagrams and examples, along with pentagon motif for rounded side bag projects, and half/quarter hexagons for blanket projects  from Ravelry. Ravelry PDF 50% off until end of day November 15th, 2025 (UTC), to celebrate the release of this pattern.

To save this pattern to make later, add to your Ravelry queue, and/or pin via the images below:
This is an original pattern by Farrah Jane Tate. You are welcome to sell products you have made using my patterns; however, I ask that you refer to the exact name of my pattern somewhere in the text of your listing. You may not copy, re-publish, sell, distribute, translate without permission, or claim my photos or patterns as your own in any way. This pattern may not be used in a classroom/workshop setting without my permission. Please note: If you have downloaded this pattern from an unofficial site (other than Ravelry, Love Crafts, Etsy, or my personal blog), this will be an unauthorised version and may not be the most current version. Please visit one of these sites to download an official, version-controlled copy.
Pattern Details
Refer to Appendix A for example project details.
- Skill Level: Easy
- Yarn: DK/8ply/Cat. 3 weight or Worsted/10ply/Cat. 4 weight. Amount will vary with chosen yarn and type of motif.
- Hook: Use yarn label instructions as a guide for selecting hook size. Swatch to determine the optimal hook size for your tension.
- Motif Size: Varies with motif shape and weight and brand of yarn.
- Gauge: Specific gauge not required.
- Stitch Terminology: US. Refer to Abbreviations and Special Stitch Instructions.
- Pattern Synopsis: Hexagon/Pentagon constructed in 7 rounds. Rounds 1 and 2 flower centre, Rounds 3, 4 and 5 petals, Round 6 circle, Round 7 hexagon or pentagon. Half/quarter hexagons constructed in 7 rows. Project diagrams and examples provided.
- Social Media Share: Tag me @TheCrochetFix #FlowerPowerMotif #FlowerPowerHexagon #FlowerPowerHexagonBlanket #FlowerPowerHexagonBag
Abbreviations
- ~ = Approximately.
- 2DCCl = Two Double Crochet Cluster. Refer to Special Stitch Instructions.
- 3L = Third Loop.
- 3LO = Third Loop Only.
- Beg = Beginning.
- BL = Back Loop.
- BLO = Back Loop Only.
- Btwn = Between.
- Ch = Chain.
- Col(s) = Color(s)/Colour(s).
- DC = Double Crochet.
- DC2Tog = Double Crochet Two Together. Refer to Special Stitch Instructions.
- DK = Double Knit yarn. Equivalent to an 8ply or light worsted weight yarn (slightly thicker than sport weight and slightly thinner than worsted weight).
- Fin = Finishing.
- FL = Front Loop.
- FLO = Front Loop Only.
- HDC = Half Double Crochet.
- Invis Join = Invisible Join. Refer to Special Stitch Instructions.
- JAYG = Join As You Go.
- MC = Magic Circle.
- Prev = Previous.
- Puff = Modified Puff Stitch. Used for example bag handle only. Refer to Special Stitch Instructions.
- Rem = Remaining.
- Rep = Repeat.
- Rnd(s) = Round(s).
- RS = Right Side.
- SC = Single Crochet.
- Sk = Skip.
- Sl St = Slip Stitch.
- St(s) = Stitch(es).
- WS = Wrong Side.
- Yo = Yarn over (hook).
Special Stitch Instructions
2DCCl
Note: The construction of this st is similar to the DC2Tog except it is worked in a single st from the prev rnd (rather than over two sts).
Yo, insert hook through st, yo, pull through a loop (three loops on hook), yo, pull yarn through first two loops on hook (two loops on hook). Yo, insert hook through same st, yo, pull through a loop (four loops on hook), yo, pull yarn through first two loops on hook (three loops on hook). Yo, pull yarn through all three loops on hook.
DC2Tog
Note: The construction of this st is similar to the 2DCCl except it is worked over two sts from the prev rnd (rather than in a single st).
Yo, insert hook through first st, yo, pull through a loop (three loops on hook), yo, pull yarn through first two loops on hook (two loops on hook). Yo, insert hook through next st, yo, pull through a loop (four loops on hook), yo, pull yarn through first two loops on hook (three loops on hook). Yo, pull yarn through all three loops on hook.
Invis Join
Note: Can be substituted with Sl St. Refer also to YouTube video.
Remove loop from hook, insert hook from back to front (through BL and then FL) of st that join is to be made in, return yarn loop to hook, pull yarn through st (from front to back). Gently pull yarn end to tighten join.
Puff
Note: The instructions below are for a modified Puff. If a fuller Puff is preferred, an additional rep from * can be made (for nine loops on hook).
Yo, insert hook through st, yo, pull through a loop (three loops on hook). *Yo, insert hook back through same st as before, pull through a loop (additional two loops on hook). Rep from * once more (seven loops on hook). Yo, pull yarn through six loops on hook (two loops on hook). Yo, pull yarn through both loops on hook.
Pattern Instructions
Notes:
- Beg Ch 1/Ch 2, and fin Invis Join do not count as a st.
- Make all sts within ( ) in the same st from the prev rnd.
- A st count follows each rnd instructions in ( ).
- If preferred, Sl St can be substituted for Invis Join in all rnds where the next rnd will continue with the same colour.
- If preferred Rnd 6 can be worked in FL and BL, or BLO, instead of 3LO.
- Change cols according to preference. First col for flower centre can be first three rnds (refer to Appendix A Rounded Hexagon Bag example project) or first two rnds (refer to all other Appendix A example projects). If joining a new col for Rnd 6 ensure st join location is as per rnd note.
- Before making a flower power motif project, first decide whether the motifs will be joined together after all motifs have been completed, or during last rnd of motif construction via a JAYG method. Refer also to Joining Motifs.
- The half and quarter hexagon motifs are made in rows. The instructions have been written in rows alternating RS and WS. Depending on col changes, two consecutive ‘RS’ rows may be preferrable. Experiment to determine best finish for the chosen project/col changes.
- The Pentagon motif is not intended to be used as a standalone motif and has been included for rounded side bag options only (these being the Rectangular Tote 2, Small Hexagonal Bag 2, and Chunky Bottom Bag 2). The pentagon motifs will likely not sit completely flat (by design for the applicable bag projects that use these folded). These can also be used for the rounded peak of a hat.
- Refer to PDF for example project construction diagrams.
- For best hexagon motif finished appearance, wet or steam block motif.
Full Hexagon
Beg Circle
Leaving a beg yarn tail of sufficient length to sew in, make a circle with either MC, or Ch 4 and Sl St into first ch.
Rnd 1
Ch 2, 12 DC in circle, Invis Join into first DC. (12 DC)
Rnd 2
Ch 2, 2 DC in each st around, Invis Join into first DC. (24 DC)
Rnd 3
Ch 2, 2 DC in first st, 2DCCl in next st, *2 DC in next st, 2DCCl in next st, rep from * around, Invis Join into first DC. (24 DC, 12 2DCCl)
Rnd 4
Ch 1, HDC in first st, 2 DC in next st, 3 DC in next st, 2 DC in next st, HDC in next st, Sl St in next st (Petal made), *HDC in next st, 2 DC in next st, 3 DC in next st, 2 DC in next st, HDC in next st, Sl St in next st (Petal made), rep from * around, Invis Join into first HDC. (6 Petals (each with 2 HDC, 7 DC, Sl St))
Rnd 5
Sl St into next st, Ch 1, HDC in same st, 2 DC in next two st, 3 DC in next st, 2 DC in next two st, HDC in next st, sk next st, SC in next st from Rnd 3 (over the top of Sl St from Rnd 4) (Petal made), *sk next st, HDC in next st, 2 DC in next two st, 3 DC in next st, 2 DC in next two st, HDC in next st, sk next st, SC in next st from Rnd 3 (over the top of Sl St from Rnd 4) (Petal made), sk next st, rep from * around, Invis Join into first HDC. (6 Petals (each with 2 HDC, 11 DC, SC))
Rnd 6
Note: Commence rnd in centre/middle DC of any petal from Rnd 5.
Working all st in 3LO only: Ch 1, SC in first two sts, HDC in next two sts, DC in next two sts, DC2Tog in next st and first st of next Petal (i.e. sk SC), DC in next two sts, HDC in next two sts, *SC in next three sts (i.e. the middle three Petal DC sts), HDC in next two sts, DC in next two sts, DC2Tog in next st and first st of next Petal (i.e. sk SC), DC in next two sts, HDC in next two sts, rep from * around, SC in last st, Invis Join into first SC. (18 SC, 24 HDC, 24 DC, 6 DC2Tog)
Rnd 7
Ch 2, (DC, HDC) in first st, HDC in next 11 sts, *(HDC, DC, HDC) in next st, HDC in next 11 sts, rep from * around, HDC in first st (alongside first DC), Invis Join into first DC. (78 HDC, 6 DC)
Finishing
Sew in yarn ends securely on WS of motif.
Full Pentagon
Refer to Ravelry PDF.
Half Hexagon A
Refer to Ravelry PDF.
Half Hexagon B
Refer to Ravelry PDF.
Quarter Hexagon A
Refer to Ravelry PDF.
Quarter Hexagon B
Refer to Ravelry PDF.
Joining Motifs
Motifs can be joined by either sewing or crocheting the motifs together.
If crocheting motifs together, this can be done on either RS or WS, depending on the preferred join appearance, with options including simple Sl St or SC, or more complex Ch braid joins.
Another option for quick and efficient construction is JAYG in the last rnd.
Refer to YouTube video for several joining options using a crochet hook.
Blanket or Cushion Cover Diagrams
Refer to Ravelry PDF.
Bag Diagrams
Refer to Ravelry PDF for all diagrams.
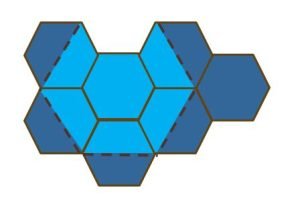
Includes four Rectangular Tote Bag diagrams, two Small Hexagonal/Pentagonal Bag diagrams, and two Chunky Bottom Bag diagrams.
Example provided below is Small Hexagonal Bag 1:
Notes:
- Light blue represents bag front; dark blue represents bag back.
- Dotted lines are fold lines. Fold dark blue hexagons/hexagon halves to bag back.
Pattern Versioning
| Version | Date | Comments |
| 0.1 | 21/04/2023 | Initial draft – large and small hexagon. |
| 0.2 | 05/06/2024 | Added instructions for medium hexagon. |
| 0.3 | 22/07/2024 | Added pentagon instructions for alternate bag design options. |
| 0.4 | 23/07/2025 – 24/09/2025 | Split original pattern document into separate documents for three motif sizes. |
| 0.5 | 12/11/2025 | Published version |
Acknowledgements
Many thanks to the following testers for testing the various Flower Power Motif designs:
- Kelly Reynolds – @mymummymadethis on IG and FB, Kellylour on Ravelry, MyMummyMadeThisShop on Etsy.
- Tania Barry – @shewgirlscrochetcreations on IG, shewgirl on Ravelry.
- Skye – @skyebomonkey on IG, Skyebo on Ravelry
- Michele.
- Cathryn – @burli_makes on IG, Burli on Ravelry.
- Iman Zaghloul – @craftymusings on IG.
- Paoloa Serra – @uncinettodipier on IG.
- Hilda Vasica – @vasicahilda on IG, Hvasica on Ravelry.
Appendix A: Example Projects
For additional inspiration, refer to Ravelry projects.
Retro Blanket
- Yarn: ~750g/26.5Oz (~5 balls) of Portacraft Ice Cream 8ply Acrylic Yarn Cake (closer to a 10ply/Worsted/Cat. 4 equivalent) in One Fine Day colourway.
- Hook: 5mm/H/8.
- 30 Motifs: 16 hexagons, 4 half hexagon A, 8 half hexagon B, 2 quarter hexagon A. Motifs are a random mix of all cake cols, using 2 rnds of first col, 3 rnds of second col, 2 rnds of third col.
- Motif join technique: JAYG on RS (during construction of last rnd of motif) – remove loop from hook, insert hook from back to front through corresponding motif st to join into, replace loop on hook and pull through st, work last rnd motif st as per pattern.
- Blanket Size: ~100cm/39in square.
Rounded Hexagon Bag – Blue/Mustard/Natural
- Yarn: Three shades of 8ply/DK 4/Cat. 3 Seasons Marvel yarn in Gold (A), Duck Egg (B), and Natural (C), ~160g/5.5Oz in total.
- Hook: 4mm/G/6.
- 7 Motifs: 3 hexagons, 4 pentagons. 2 hexagons with 3 rnds A, 2 rnds B, 2 rnds C, followed by single rnd of each of A/B/C. 1 hexagon with 3 rnds B, 2 rnds A, 2 rnds C, followed by single rnd of each of B/A/C. All pentagons with 3 rnds B, 2 rnds A, 2 rnds C, followed by single rnd of each of B/A/ C. Standard pattern motifs were extended by three rnds using HDC in each st along sides and double increase (HDC, DC, HDC) in corners. Increase made in middle st of increase from prev rnd in first two rnds, and in third st of increase in last rnd.
- Diagram: Small Hexagonal/Pentagonal Bag 2.
- Motif join technique: Joined after all motifs made. WS Sl St through both FL and BL of each motif with C. A rnd of SC with C was made on RS top opening of bag before joining handle.
- Strap: Long rows ~62.5cm/24.25in length of SC worked on either side of foundation chain, with order of C/B/A/C. Sewn to either side of bag with needle.
- Bag Size: ~9cm/23in in width at base, ~40cm/15.5in tall (from base to tip of pentagon).
Chunky Bottom Bag – Green and Browns
- Yarn: Four shades mix of 8ply/DK/Cat. 3 4 Seasons Marvel yarn in Brown Marble (A) and Sage (B), and Carnival 8ply/DK/Cat. 3 Acrylic yarn in Brown (C) and Natural (D), ~310g/11Oz in total.
- Hook: 4mm/G/6.
- 18 Motifs: 18 hexagons. All hexagons Rnds 6/7 in A. 8 hexagons with Rnds 3/4/5 in B – 4 with Rnds 1/2 in C and 4 with Rnds 1/2 in D. 6 hexagons with Rnds 3/4/5 in C – 2 with Rnds 1/2 in B, 4 with Rnds 1/2 in D. 4 hexagons with Rnds 3/4/5 in D – all with Rnds 1/2 in B.
- Diagram: Chunky Bottom Bag 1.
- Motif join technique: Joined after all motifs made. WS Sl St through both FL and BL of each motif with C. A rnd of SC in C was made on RS top opening of bag before making handle.
- Handle: Made separately. Long rows (~46cm/ 18in length) of Star St in C. Simple SC substitution option. Row width spanning two adjoined hexagon sides (~16.5cm/6.5in and 11 rows in total). Both ends of handle sewn separately to bag. Handle long side edges folded inwards/over twice to centre to form a structured cylinder and then seamed along the cylinder (on underside of handle), leaving an opening of 10cm/4in at each end of handle.
- Bag Size: ~44.5cm/17.5in in width at base, 36cm/14in tall (from base to top of hexagon).
Tote Bag
- Yarn: Three shades of 10ply/Worsted/Cat. 4 Source of Fibre Aran and Eve yarn in Carrot Cake (A), Macaroon (B) and Scone (C), ~310g/11Oz in total.
- Hook: 5mm/H/8.
- 7 Motifs: 7 hexagons. 4 hexagons with 2 rnds B, 3 rnds A, 2nds C. 3 hexagons with 2 rnds A, 3 rnds C, 2 rnds B.
- Diagram: Rectangular Tote Bag 1.
- Motif join technique: Joined after all motifs made. Sl St together on RS through BLO of each motif with A. A rnd of SC in BLO was made on RS top opening of bag in A before joining handle.
- Handle: Short rows of SC with first row equal to width of one hexagon side (~10cm/4in for example bag). Made in two equal halves ~19cm/7.5in in length, from bag outwards and joined with Sl St on WS. A single st reduction was made at the start and end of rows 2/3/4. St count maintained from fifth row onwards. Each handle half made with 8 rows of B/C/A, then 4 rows of B. After central handle join was made, the long edges of the handle were stitched together to form a cylinder with a ~4cm/1.5in opening at each end of handle (where handle joins bag).
- Bag Size: ~33cm/13in in width at base, ~40.5cm/16in tall (from base to top of hexagon).


Hexagonal/Pentagonal Bag
- Yarn: Three shades of 10ply/Worsted/Cat. 4 Source of Fibre Aran and Eve yarn in Carrot Cake (A), Scone (B) and Macaroon (C), ~285g/10Oz in total.
- Hook: 5mm/H/8.
- 7 Motifs: 3 hexagons and 4 pentagons, each with 2 rnds A, 3 rnds B, 2nds C.
- Diagram: Small Hexagonal/Pentagonal Bag 2.
- Motif join technique: Joined after all motifs made. Sl St together on WS through both loops of each motif with B. A rnd of SC in was made on RS top opening of bag in B before joining handle.
- Handle: Modified Puff handle. Interchangeable handle design with loops on either end of handle designed to loop over large buttons sewn to inside of bag. For Puff handle from image, commence with Ch 6 and Sl St into first Ch to make a circle. For first row: Ch 3, (2 Puff, DC) in circle. Work additional rows, as follows: *Turn, Ch 3, 2 Puff btwn prev row puffs, DC in third Ch of Ch 3. Rep from * until handle sufficient length. Turn, Ch 6, Sl St into third Ch of Ch 3.
- Bag Size: ~25.5cm/10in in width at base, ~35.5cm/14in tall (from base to tip of pentagon).
For More Free Motif Designs...
If you have enjoyed this motif design, you may enjoy my other free motif designs also.
Click on button to view my other motif designs.